virtualbox 的几种网络模式

1. NAT

NAT 模式下,虚拟机连通外部网络类似于我们使用路由器上网。也就是说,虚拟机内部可以访问外部网络,外部网络无法直接连接虚拟机,但是可以通过端口转发的方式实现。

我们使用 virtualbox 启动一个 NAT 网络模式的虚拟机。查看它的网络接口:

$ ip link

1: lo: <LOOPBACK,UP,LOWER_UP> mtu 65536 qdisc noqueue state UNKNOWN mode DEFAULT group default qlen 1000
    link/loopback 00:00:00:00:00:00 brd 00:00:00:00:00:00
2: eth0: <BROADCAST,MULTICAST,UP,LOWER_UP> mtu 1500 qdisc pfifo_fast state UP mode DEFAULT group default qlen 1000
    link/ether 52:54:00:8a:fe:e6 brd ff:ff:ff:ff:ff:ff
3: eth1: <BROADCAST,MULTICAST,UP,LOWER_UP> mtu 1500 qdisc pfifo_fast state UP mode DEFAULT group default qlen 1000
    link/ether 08:00:27:8e:f8:c6 brd ff:ff:ff:ff:ff:ff

再看一下路由表:

$ ip route

default via 10.0.2.2 dev eth0 proto dhcp metric 100 
10.0.2.0/24 dev eth0 proto kernel scope link src 10.0.2.15 metric 100 
192.168.88.0/24 dev eth1 proto kernel scope link src 192.168.88.101 metric 101

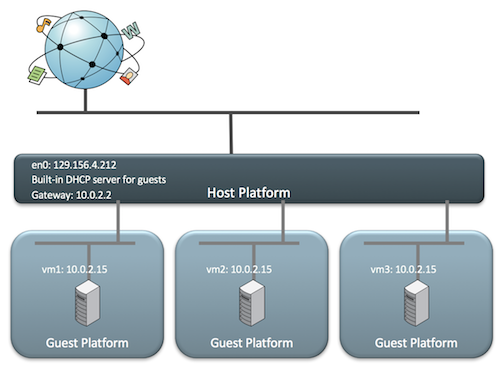
默认的路由规则是通过 10.0.2.2 出去,这里 10.0.2.2 这个设备就相当于路由器的地址。并且虚拟机的 eth0 的地址 10.0.2.15 是通过 dhcp 来获得的。NAT 模式下的工作机制如下图:

nat

当虚拟机启动时,它会使用 DHCP 来获取一个 IP 地址。VirtualBox 会处理这个 DHCP 请求,并且告诉虚拟机它分配到的 IP 地址和网关地址。在这种模式下,每个虚拟机都会分配相同的 IP 地址(10.0.2.15),因为每个虚拟机都认为它们实在自己的隔离网络内。当它们通过网关(10.0.2.2)发送数据包时,VirtualBox重写这些包,让它们看起来是来自宿主机,而不是来自于虚拟机。

NAT 网络的特点如下:

  • 虚拟机位于私有 LAN 中。
  • VirtualBox 扮演一个 DHCP 服务。
  • VirtualBox NAT 引擎来做地址转换。
  • 目标服务看到的流量是来自于 VirtualBox 宿主机。
  • 宿主机和虚拟机都不需要配置。
  • 虚拟机作为客户端时是非常合适的。
  • 虚拟机作为服务端不合适

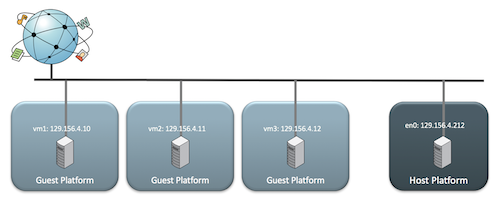
Bridged Networking

桥接网络给我的第一印象就是和 linux 上的 bridge。在这种网络模式下,虚拟机和宿主机在网络拓扑中是平等的,宿主机上会有一个虚拟的 NIC 桥接到物理 NIC 上。关于这个 bridge 的实现,VirtualBox 在宿主机上使用了设备驱动来从物理网络适配器上过滤数据。因此这个驱动被称为 net filter。这使得 VirtualBox 可以从物理网络上拦截数据以及注入数据,就像是用软件实现了一个网络接口一样。

如下图所示:

bridged

bridged networking 的特点如下:

  • VirtualBox 负责桥接到主机网络(这也是在 linux 宿主机上并不能看到上面所谓的 bridge 的原因)
  • 对于客户端或服务端的虚拟机都很友好
  • 会消耗所处网络内的 IP 地址
  • 可能需要对虚拟机进行配置
  • 生产环境的最佳选择

Internal Networking

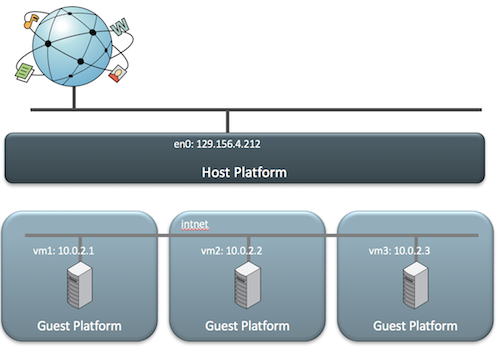
Internal Networking 和 bridged networking 类似,可以和外部的网络通信。但是这里的外部网络仅指可以在同一宿主机上的相同的内网的其他虚拟机。如下图所示:

internal

我们可以通过命令行创建一个 DHCP 服务,网络的名称是 intnet

$ vboxmanage dhcpserver add -netname intnet --ip 10.10.0.1 --netmask 255.255.0.0 --lowerip 10.10.10.1 --upperip 10.10.10.255 --enable

然后在 VirtualBox 中创建虚拟机时加入这个网络即可。这个网络中的所有虚拟机都是和外界隔离的,包括宿主机。

Internal Networking 的特点是:
– 虚拟机可以看到其他在同一个网络内的虚拟机
– 宿主机看不到内部网络
– 网络需要手动配置
– 即使宿主机没有网络也可以工作
– 可以和 Bridged 网络一起使用
– 适合多层解决方案

Host-Only Networking

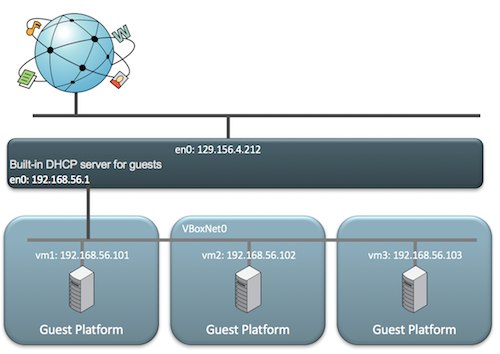
Host-Only Networking 和 Internal Networking 是相似的,你可以指定虚拟机位于的网络,比如说:vboxnet0。所有在 vboxnet0 上的虚拟机都可以看见彼此,此外宿主机也可以看见这些虚拟机。当然,其他外部的机器没有办法看到这个网络上的虚拟机,因此取名为 “Host-only”。

其网络拓扑图如下:

host_only.png.jpeg

Host-Only 网络的特点如下:
– VirtualBox 为虚拟机和宿主机创建私有的内部网络
– 宿主机上可以看到新的软件 NIC
– VirtualBox 提供了 DHCP 服务
– 虚拟机 无法访问外部互联网
– 即使宿主机失去连接,虚拟机依然正常工作
– 适合开发的场景

参考资料

Chapter 6. Virtual Networking
Oracle VM VirtualBox: Networking options and how-to manage them

[Gaia Scheduler] gpu-manager 的虚拟化 gpu 分配流程

概述

在之前的一篇文章主要是分析了 gpu-manager 的启动流程。关于 gpu-manager 应该会有一系列的文章,一是觉得这是一个很有价值的项目,二是为这个项目花了好几天去看代码,想通过写文章的方式对内容进行梳理。

这篇文章主要分析 gpu-manager 的虚拟 gpu 分配原理,我认为将虚拟 gpu 分配给容器主要有两个重点:

  • gpu-manager 作为 device plugin 的工作流程
  • 虚拟 gpu 分配的最优方案,分配需要保证最少碎片,同时性能最好

从 pod 调度到虚拟 gpu 分配

这一部分会涉及到 device plugin 的工作机制,因此不熟悉的话可以看一下之前的一篇文章:Kubernetes开发知识–device-plugin的实现。下面附上一张这篇文章中 device plugin 的工作时序图:

device plugin

在之前的启动流程分析文章中,说到 gpu-manager 向 kubelet 注册。在这之后, gpu-manager 就正式作为一个 device plugin 来工作了。这个时候,我们可以创建如下的 pod:

apiVersion: v1
kind: Pod
metadata:
  name: tf-training-example-10
  namespace: test
  labels:
    name: tf-training-example
spec:
  restartPolicy: Never
  containers:
  - name: tf-training-example
    image: joyme/tf_training_example:1.5
    resources:
      requests:
        tencent.com/vcuda-core: 20
        tencent.com/vcuda-memory: 15
      limits:
        tencent.com/vcuda-core: 20
        tencent.com/vcuda-memory: 15

这个创建 pod 的请求会到达 kubernetes 的 API Server,然后由 kube-scheduler 进行调度。kube-scheduler 的调度经过预选和优选两个阶段,确定了最佳的目标节点。这时候 kubelet 就上场了。因为我们的 pod 中的容器请求了 vcuda-corevcuda-memory 这两个资源,但是 kubelet 并没有能力去给容器分配这些资源,于是它就找是谁注册了这些资源类型,然后发现是 vcore 和 vmemory 这两个服务注册的,于是使用 grpc 和 /var/lib/kubelet/device-plugins/vcore.sock 以及 /var/lib/kubelet/device-plugins/vmemory.sock 通过 unix socket 通讯。

vcore 和 vmemory 是两种资源,因此这里其实相当于注册了两个 device plugin。

对于 vcuda-memory,kubelet 调用的 Allocate 方法如下:

/** device plugin interface */
func (vr *vmemoryResourceServer) Allocate(ctx context.Context, reqs *pluginapi.AllocateRequest) (*pluginapi.AllocateResponse, error) {
    glog.V(2).Infof("%+v allocation request for vmemory", reqs)
    fakeData := make([]*pluginapi.ContainerAllocateResponse, 0)
    fakeData = append(fakeData, &pluginapi.ContainerAllocateResponse{})

    return &pluginapi.AllocateResponse{
        ContainerResponses: fakeData,
    }, nil
}

这里其实并没有做任何实际分配操作,我们可以认为 vcuda-core 和 vcuda-memory 必然是同时申请分配的,因此我们只需要处理二者之一即可。

对于 vcuda-core,kubelet 会调用的 Allocate 方法代码如下:

func (vr *vcoreResourceServer) Allocate(ctx context.Context, reqs *pluginapi.AllocateRequest) (*pluginapi.AllocateResponse, error) {
    glog.V(2).Infof("%+v allocation request for vcore", reqs)
    return vr.mgr.Allocate(ctx, reqs)
}

最终会走到 pkg/services/allocator/nvidia/allocator.go 的 Allcate 方法中。下面就来到这篇文章最复杂的部分了。

func (ta *NvidiaTopoAllocator) Allocate(_ context.Context, reqs *pluginapi.AllocateRequest) (*pluginapi.AllocateResponse, error) {
}

我们先看一下函数原型,reqs *pluginapi.AllocateRequest 这个参数是分配请求,然后返回了一个分配响应 *pluginapi.AllocateResponse。这里看一下 AllocateRequest:

// - Allocate is expected to be called during pod creation since allocation
//   failures for any container would result in pod startup failure.
// - Allocate allows kubelet to exposes additional artifacts in a pod's
//   environment as directed by the plugin.
// - Allocate allows Device Plugin to run device specific operations on
//   the Devices requested
type AllocateRequest struct {
    ContainerRequests []*ContainerAllocateRequest `protobuf:"bytes,1,rep,name=container_requests,json=containerRequests" json:"container_requests,omitempty"`
}

type ContainerAllocateRequest struct {
    DevicesIDs []string `protobuf:"bytes,1,rep,name=devicesIDs" json:"devicesIDs,omitempty"`
}

很明显,请求里包含了每个容器需要的设备数组。同时通过 AllocateRequest 上的注释可以得出以下信息:

  • Allocate 是在 pod 创建时被调用的,因此任何容器分配失败都会造成pod启动失败。
  • Allocate 允许 kubelet 在 pod 环境中引入更多的 artifacts,这部分工作由我们的 device plugin 主导。对于 gpu manager 来说就是,覆盖容器内的 LD_LIBRARY_PATH,挂载 cuda 库文件等等。
  • Allocate 允许 device plugin 在设备上运行特定的操作。

然后再来看一下 AllocateResponse:

// AllocateResponse includes the artifacts that needs to be injected into
// a container for accessing 'deviceIDs' that were mentioned as part of
// 'AllocateRequest'.
// Failure Handling:
// if Kubelet sends an allocation request for dev1 and dev2.
// Allocation on dev1 succeeds but allocation on dev2 fails.
// The Device plugin should send a ListAndWatch update and fail the
// Allocation request
type AllocateResponse struct {
    ContainerResponses []*ContainerAllocateResponse `protobuf:"bytes,1,rep,name=container_responses,json=containerResponses" json:"container_responses,omitempty"`
}

type ContainerAllocateResponse struct {
    // List of environment variable to be set in the container to access one of more devices.
    Envs map[string]string `protobuf:"bytes,1,rep,name=envs" json:"envs,omitempty" protobuf_key:"bytes,1,opt,name=key,proto3" protobuf_val:"bytes,2,opt,name=value,proto3"`
    // Mounts for the container.
    Mounts []*Mount `protobuf:"bytes,2,rep,name=mounts" json:"mounts,omitempty"`
    // Devices for the container.
    Devices []*DeviceSpec `protobuf:"bytes,3,rep,name=devices" json:"devices,omitempty"`
    // Container annotations to pass to the container runtime
    Annotations map[string]string `protobuf:"bytes,4,rep,name=annotations" json:"annotations,omitempty" protobuf_key:"bytes,1,opt,name=key,proto3" protobuf_val:"bytes,2,opt,name=value,proto3"`
}

这里我们又可以看到一些关键信息,AllocateResponse 为每个容器返回了 ContainerAllocateResponse,包括容器的环境变量,容器的挂载,容器的设备信息,容器的 annotations 信息。其中,容器的设备信息如下:

// DeviceSpec specifies a host device to mount into a container.
type DeviceSpec struct {
    // Path of the device within the container.
    ContainerPath string `protobuf:"bytes,1,opt,name=container_path,json=containerPath,proto3" json:"container_path,omitempty"`
    // Path of the device on the host.
    HostPath string `protobuf:"bytes,2,opt,name=host_path,json=hostPath,proto3" json:"host_path,omitempty"`
    // Cgroups permissions of the device, candidates are one or more of
    // * r - allows container to read from the specified device.
    // * w - allows container to write to the specified device.
    // * m - allows container to create device files that do not yet exist.
    Permissions string `protobuf:"bytes,3,opt,name=permissions,proto3" json:"permissions,omitempty"`
}

即在容器中挂载设备需要:

  • 设备相对于容器的地址
  • 设备在宿主机上的地址
  • 设备的 Cgroups 信息

这时候我们再来重新思考 gpu-manager 的 gpu 虚拟化原理。如果你看过腾讯关于 Gaia Scheduler 的论文,就会知道 gpu-manager 需要做以下工作:

  • 为容器挂载 cuda 相关的库,包括 vcuda-control 这个项目的拦截库
  • 通过覆盖容器中的 LD_LIBRARY_PATH 来将 cuda 调用指向 libcuda-control.so 这个库,这个库里面对显存和计算 api 做了拦截。
  • 为容器挂载 vcuda.sock,在容器调用特定的 cuda api 时,会触发 grpc 调用,通过 vcuda.sock 和 virtual manager 通信,virtual manager 下发容器配置。这样拦截库就知道自己应该怎么限制容器了。这里留一个问题 A,为什么要大费周章的通过 grpc,直接挂载容器配置文件可行吗?

这些 gpu-manager 要做的工作都是 device plugin 的 Allocate 调用提供的能力。所以 gpu-manager 需要在 Allocate 期间完成这么多的工作。这也是这部分比较复杂的原因。下面我们带着这些信息去看代码,会更容易懂一些。下面的代码都是来自于 pkg/services/allocator/nvidia/allocator.go 中的 Allocate 方法,但是因为很长,所以我会截取出来分析。

// k8s send allocate request for one container at a time
req := reqs.ContainerRequests[0]
resps := &pluginapi.AllocateResponse{}
reqCount = uint(len(req.DevicesIDs))

这部分取了 Allocate 中的第一个 ContainerRequest,通过注释知道,k8s 一次只为一个容器发送分配请求。

    if ta.unfinishedPod != nil {

    } else {

    }

接下来有一个对 unfinishedPod 的判断,因为 k8s 一次请求只针对一个容器,因此这里的 unfinishedPod 指的是只分配了部分容器,还有其他容器没有分配的 pod。这里我们需要仔细思考一下,使用 unfinishedPod 的目的是什么?看到这里我有两个猜测:

  1. 因为 k8s 一次请求只针对一个容器,所以为了优先分配完一个 pod,就需要标记 unfinishedPod 了。但是仔细想想,因为 Allocate 的请求和响应中都没有容器的信息,所以本次请求分配的容器是由 kubelet 决定的。device plugin 并没有能力改变容器的分配顺序,这个想法是错的。
  2. 为了性能考虑。因为 gpu-manager 有两个 device plugin:vmemory 和 vcore。但是之前说到 vmemory 的分配没有做任何工作。所以我们不得不在分配 vcore 的时候,把 vmemory 的分配工作也做了。可是我怎么知道当前正在给哪个容器分配资源?那我也更不知道分配多少 vmemory 了。但是天无绝人之路啊,我可以遍历当前节点上的所有 pod,然后挑出需要 gpu 资源的 pod。然后再从这些 pod 中挑出符合这次请求的容器。这里如果使用 unfinishedPod 就避免了重复的大规模查找操作。

那么,假设现在还有一个未完成的 pod,会执行下面的代码

// 候选pod
candidatePod = ta.unfinishedPod
// 从已分配的pod中查找
cache := ta.allocatedPod.GetCache(string(candidatePod.UID))
if cache == nil {
    msg := fmt.Sprintf("failed to find pod %s in cache", candidatePod.UID)
    glog.Infof(msg)
    return nil, fmt.Errorf(msg)
}
for i, c := range candidatePod.Spec.Containers {
    if _, ok := cache[c.Name]; ok {
        continue
    }

    if !utils.IsGPURequiredContainer(&c) {
        continue
    }

    if reqCount != utils.GetGPUResourceOfContainer(&candidatePod.Spec.Containers[i], types.VCoreAnnotation) {
        msg := fmt.Sprintf("allocation request mismatch for pod %s, reqs %v", candidatePod.UID, reqs)
        glog.Infof(msg)
        return nil, fmt.Errorf(msg)
    }
    // 候选的容器(应该就是待分配资源的容器)
    candidateContainer = &candidatePod.Spec.Containers[i]
    found = true
    break
}

上面这段代码遍历这个 pod 的容器列表,然后和缓存中的容器对比,如果没有分配并且需要 gpu 资源,并且容器请求的资源量和当前的分配请求一致,就认定这个容器是我们接下来要为之分配的候选人了。这里我们又有一个问题 B,如果一个 Pod 中有多个 vcore 请求一致,但是 vmemory 不同的容器,这里只通过 vcore 的请求量来判断,可以保证这个分配请求和我们的候选容器能对的上吗?这个问题我们可以产生如下的猜测:

  1. AllocateRequest 是按照 Pod 中的容器顺序来的,这样我们在做 reqCount 对比的时候,因为顺序一致就能保证请求和候选容器是对应关系了。那么,AllocateRequest 是按照 Pod 中容器顺序来的吗?这是一个新的问题 C。
  2. 其实请求和候选容器不对应也没关系,因为容器中进行 cuda 调用拦截的时候,才会请求 virtual manager,拿到容器的资源限制配置信息。只要这个环节能保证容器和其请求的资源量对应上,就不会有任何问题?这也是我们的问题 E:cuda 调用拦截的时候,如何保证容器和配置的对应关系。这也和问题 A 相呼应,如果这个猜测成立,那就是为什么问题 A 中要大费周折的使用 grpc 调用下发配置,而不是直接把配置信息挂载或写到容器的变量中。

接下来我们继续看,如果没有未完成的容器,就执行以下代码:

// 获取候选的pod,候选的pod是当前节点上的需要GPU,没有分配并且不应该删除的pod
pods, err := getCandidatePods(ta.k8sClient, ta.config.Hostname)
if err != nil {
    msg := fmt.Sprintf("Failed to find candidate pods due to %v", err)
    glog.Infof(msg)
    return nil, fmt.Errorf(msg)
}

for _, pod := range pods {
    if found {
        break
    }
    for i, c := range pod.Spec.Containers {
        if !utils.IsGPURequiredContainer(&c) {
            continue
        }
        podCache := ta.allocatedPod.GetCache(string(pod.UID))
        if podCache != nil {
            if _, ok := podCache[c.Name]; ok {
                glog.Infof("container %s of pod %s has been allocate, continue to next", c.Name, pod.UID)
                continue
            }
        }
        if utils.GetGPUResourceOfContainer(&pod.Spec.Containers[i], types.VCoreAnnotation) == reqCount {
            glog.Infof("Found candidate Pod %s(%s) with device count %d", pod.UID, c.Name, reqCount)
            candidatePod = pod
            candidateContainer = &pod.Spec.Containers[i]
            found = true
            break
        }
    }
}

和上面的不同之处,就是在获取候选 pod 这里。获取候选 pod 的代码如下:

    candidatePods := []*v1.Pod{}
    allPods, err := getPodsOnNode(client, hostname, string(v1.PodPending))

    for _, pod := range allPods {
        current := pod
        if utils.IsGPURequiredPod(¤t) && !utils.IsGPUAssignedPod(¤t) && !utils.ShouldDelete(¤t) {
            candidatePods = append(candidatePods, ¤t)
        }
    }

    return OrderPodsdByPredicateTime(candidatePods), nil

先是获取节点上的所有 pod,然后从节点上的 pod 中选取需要 GPU,并且没有分配 GPU,并且不应该删除的 pod。最后得到一个候选 pod 列表。最后对这个列表根据时间排序。这样就可以拿到最先被调度的 pod 了。这里其实也默认了一个前提,最先调度的 pod 会最先发出分配请求。这里还有一个需要注意的地方,排序依据的时间有两个选择:预选时间或创建时间。

    if predicateTimeStr, ok := pod.ObjectMeta.Annotations[types.PredicateTimeAnnotation]; ok {
        u64, err := strconv.ParseUint(predicateTimeStr, 10, 64)
        if err != nil {
            glog.Warningf("Failed to parse predicate Timestamp %s due to %v", predicateTimeStr, err)
        } else {
            predicateTime = u64
        }
    } else {
        // If predicate time not found, use createionTimestamp instead
        predicateTime = uint64(pod.ObjectMeta.CreationTimestamp.UnixNano())
    }

    return predicateTime

其中,预选时间并不是 kube-scheduler 添加的,而是和 gpu-manager 配合使用的 gpu-admission 这个项目。如果没有预选时间,就会使用 pod 的创建时间。这也就是说,我们不使用 gpu-admission 这个项目,也可以正常使用 gpu-manager。其实这里还有一个问题 D,我怎么保证挑出来的容器就是这次分配请求的呢?这个问题还要留在后面的分析中。

现在我们拿到了候选容器,就需要进行真正的分配工作了。

// get vmemory info from container spec
vmemory := utils.GetGPUResourceOfContainer(candidateContainer, types.VMemoryAnnotation)
for i := 0; i < int(vmemory); i++ {
    req.DevicesIDs = append(req.DevicesIDs, types.VMemoryAnnotation)
}

resp, err := ta.allocateOne(candidatePod, candidateContainer, req)
if err != nil {
    glog.Errorf(err.Error())
    return nil, err
}
resps.ContainerResponses = append(resps.ContainerResponses, resp)

这段代码中,我们拿到容器的 vmemory 信息。因为 vmemory 是根据数量划分的。1 个 vmemory 相当于 256M 的 memory,也就是一个 deviceID。这里请求多少的 vmemory,就存多少个 deviceID。然后调用 allocateOne 为单个容器进行真正的分配工作。下面我们开始分析 allocateOne 的分配逻辑。

var (
    nodes                       []*nvtree.NvidiaNode
    needCores, needMemoryBlocks int64
    predicateMissed             bool
    allocated                   bool
)

// 是否是 gpu 预选 pod
predicateMissed = !utils.IsGPUPredicatedPod(pod)
// 单节点的总内存
singleNodeMemory := int64(ta.tree.Leaves()[0].Meta.TotalMemory)
for _, v := range req.DevicesIDs {
    if strings.HasPrefix(v, types.VCoreAnnotation) {
        // 请求 core
        needCores++
    } else if strings.HasPrefix(v, types.VMemoryAnnotation) {
        // 请求 memory
        needMemoryBlocks++
    }
}

首先就是根据 deviceID 来计算需要多少 core 和 memory。接下来会调用 ta.recycle() 回收资源。回收的逻辑如下:

func (ta *NvidiaTopoAllocator) recycle() {
    activePods := watchdog.GetActivePods()

    lastActivePodUids := sets.NewString()
    activePodUids := sets.NewString()
    for _, uid := range ta.allocatedPod.Pods() {
        lastActivePodUids.Insert(uid)
    }
    for uid := range activePods {
        activePodUids.Insert(uid)
    }

    // difference 出来的就是已经运行结束的pod,可以回收分配的gpu资源
    podsToBeRemoved := lastActivePodUids.Difference(activePodUids)

    glog.V(5).Infof("Pods to be removed: %v", podsToBeRemoved.List())

    // 释放资源
    ta.freeGPU(podsToBeRemoved.List())
}

对已分配的 pod 和 正在运行的 pod 集合取差集,差集就是分配了资源但是已经停止运行的 pod 。然后对这部分 pod 释放 GPU 资源。具体的释放逻辑放在后面分析。现在继续向下看,这里我们直接跳到尝试分配资源的逻辑上。分配 gpu 资源分为三种情况:

  1. 如果需要的核心数大于 100,也就是说超过一个物理 GPU,就使用 link 评估器来选出 GPU 节点
  2. 如果正好是一个 100 核心,则使用 fragment 评估器
  3. 如果小于 100 核心,则使用 share 评估器。

情况 1 的代码如下:

eval, ok := ta.evaluators["link"]
if !ok {
    return nil, fmt.Errorf("can not find evaluator link")
}
if needCores%nvtree.HundredCore > 0 {
    return nil, fmt.Errorf("cores are greater than %d, must be multiple of %d", nvtree.HundredCore, nvtree.HundredCore)
}
nodes = eval.Evaluate(needCores, 0)

注意到这里还要求请求的核心数必须是 100 的整数,也就是说必须是整数个物理 GPU,你不能请求 1.5 个 物理 GPU 这种。

情况 2 的代码如下:

eval, ok := ta.evaluators["fragment"]
if !ok {
    return nil, fmt.Errorf("can not find evaluator fragment")
}
nodes = eval.Evaluate(needCores, 0)

情况 3 的代码如下:

// EnableShare 是在启动时指定的参数,代表是否允许多个容器共享一个gpu
if !ta.config.EnableShare {
    return nil, fmt.Errorf("share mode is not enabled")
}
if needCores == 0 || needMemory == 0 {
    return nil, fmt.Errorf("that cores or memory is zero is not permitted in share mode")
}

// evaluate in share mode
shareMode = true
// 使用 share 评估
eval, ok := ta.evaluators["share"]
if !ok {
    return nil, fmt.Errorf("can not find evaluator share")
}
// 评估出来的合适的 nvidia gpu 节点
nodes = eval.Evaluate(needCores, needMemory)
if len(nodes) == 0 {
    if shareMode && needMemory > singleNodeMemory {
        return nil, fmt.Errorf("request memory %d is larger than %d", needMemory, singleNodeMemory)
    }

    return nil, fmt.Errorf("no free node")
}

在评估出来节点之后,会先判断这个这个 pod 是否真的经过预选阶段?判断方法如下:

func IsGPUPredicatedPod(pod *v1.Pod) (predicated bool) {
    glog.V(4).Infof("Determine if the pod %s needs GPU resource", pod.Name)
    var ok bool

    // Check if pod request for GPU resource
    if GetGPUResourceOfPod(pod, types.VCoreAnnotation) <= 0 || GetGPUResourceOfPod(pod, types.VMemoryAnnotation) <= 0 {
        glog.V(4).Infof("Pod %s in namespace %s does not Request for GPU resource",
            pod.Name,
            pod.Namespace)
        return predicated
    }

    // Check if pod already has predicate time
    // tencent.com/predicate-time 是 gpu-admission 中添加的。
    if _, ok = pod.ObjectMeta.Annotations[types.PredicateTimeAnnotation]; !ok {
        glog.V(4).Infof("No predicate time for pod %s in namespace %s",
            pod.Name,
            pod.Namespace)
        return predicated
    }

    // Check if pod has already been assigned
    if assigned, ok := pod.ObjectMeta.Annotations[types.GPUAssigned]; !ok {
        glog.V(4).Infof("No assigned flag for pod %s in namespace %s",
            pod.Name,
            pod.Namespace)
        return predicated
    } else if assigned == "true" {
        glog.V(4).Infof("pod %s in namespace %s has already been assigned",
            pod.Name,
            pod.Namespace)
        return predicated
    }
    predicated = true
    return predicated
}

共有三个要求才算经过了预选:

  • resource 字段请求了 vcore 和 vgpu,并且大于 0。
  • 必须有 tencent.com/predicate-time 字段。这点要求必须经过 gpu-admission 的预选阶段。
  • 没有被分配 gpu 资源

如果经过预选的话,就需要执行以下的逻辑:

// get predicate node by annotation
containerIndex, err := utils.GetContainerIndexByName(pod, container.Name)
if err != nil {
    return nil, err
}
var devStr string
if idxStr, ok := pod.ObjectMeta.Annotations[types.PredicateGPUIndexPrefix+strconv.Itoa(containerIndex)]; ok {
    if _, err := strconv.Atoi(idxStr); err != nil {
        return nil, fmt.Errorf("predicate idx %s invalid for pod %s ", idxStr, pod.UID)
    }
    devStr = types.NvidiaDevicePrefix + idxStr
    if !utils.IsValidGPUPath(devStr) {
        return nil, fmt.Errorf("predicate idx %s invalid", devStr)
    }
} else {
    return nil, fmt.Errorf("failed to find predicate idx for pod %s", pod.UID)
}

predicateNode := ta.tree.Query(devStr)
if predicateNode == nil {
    return nil, fmt.Errorf("failed to get predicate node %s", devStr)
}

// check if we choose the same node as scheduler
if predicateNode.MinorName() != nodes[0].MinorName() {
    return nil, fmt.Errorf("Nvidia node mismatch for pod %s(%s), pick up:%s  predicate: %s",
        pod.Name, container.Name, nodes[0].MinorName(), predicateNode.MinorName())
}

也就是说,经过预选阶段的 Pod 都会根据容器的顺序在 Annotations 为该容器写上配置信息。这说明在 gpu-admission 这个项目中会为容器分配 gpu 设备。最后还要检查一下在 gpu-manager 中分配的 gpu 设备和 gpu-admission 中是否一致,不一致的话也会返回分配失败。

现在我们已经知道要为当前请求的容器分配哪个 gpu 设备,以及分配的资源数量。这样就可以构建 ContainerAllocateResponse 了。先把已分配的设备放到响应中:

    for _, n := range nodes {
        name := n.MinorName()
        glog.V(2).Infof("Allocate %s for %s(%s), Meta (%d:%d)", name, pod.UID, container.Name, n.Meta.ID, n.Meta.MinorID)

        ctntResp.Annotations[types.VCoreAnnotation] = fmt.Sprintf("%d", needCores)
        ctntResp.Annotations[types.VMemoryAnnotation] = fmt.Sprintf("%d", needMemory)

        ctntResp.Devices = append(ctntResp.Devices, &pluginapi.DeviceSpec{
            ContainerPath: name,
            HostPath:      name,
            Permissions:   "rwm",
        })
        deviceList = append(deviceList, n.Meta.UUID)

        if !allocated {
            // 在 gpu tree 中标记设备已占用
            ta.tree.MarkOccupied(n, needCores, needMemory)
        }
        allocatedDevices.Insert(name)
    }

更改响应的 Annotations:

ctntResp.Annotations[types.VDeviceAnnotation] = vDeviceAnnotationStr(nodes)

检查 pod 的所有容器是否都完成了分配,并把新的分配信息写入到 checkpoint:

unfinished := false
for _, c := range pod.Spec.Containers {
    if !utils.IsGPURequiredContainer(&c) {
        continue
    }
    podCache := ta.allocatedPod.GetCache(string(pod.UID))
    if podCache != nil {
        if _, ok := podCache[c.Name]; !ok {
            unfinished = true
            break
        }
    }
}
if unfinished {
    ta.unfinishedPod = pod
} else {
    ta.unfinishedPod = nil
}
ta.writeCheckpoint()

在响应中为容器添加 /dev/nvidiactl/dev/nvidia-uvm,如果配置了 extraConfig,还会把里面要默认添加的设备加进去:

// Append control device
ctntResp.Devices = append(ctntResp.Devices, &pluginapi.DeviceSpec{
    ContainerPath: types.NvidiaCtlDevice,
    HostPath:      types.NvidiaCtlDevice,
    Permissions:   "rwm",
})

ctntResp.Devices = append(ctntResp.Devices, &pluginapi.DeviceSpec{
    ContainerPath: types.NvidiaUVMDevice,
    HostPath:      types.NvidiaUVMDevice,
    Permissions:   "rwm",
})

// Append default device
if cfg, found := ta.extraConfig["default"]; found {
    for _, dev := range cfg.Devices {
        ctntResp.Devices = append(ctntResp.Devices, &pluginapi.DeviceSpec{
            ContainerPath: dev,
            HostPath:      dev,
            Permissions:   "rwm",
        })
    }
}

此时,响应中的设备信息已经处理结束,接下来处理容器中的环境变量,gpu manager 需要通过修改 LD_LIBRARY_PATH 来劫持程序对 cuda 的调用,然后通过 NVIDIA_VISIBLE_DEVICES 来让挂载的设备可见。

// LD_LIBRARY_PATH
ctntResp.Envs["LD_LIBRARY_PATH"] = "/usr/local/nvidia/lib64"
for _, env := range container.Env {
    if env.Name == "compat32" && strings.ToLower(env.Value) == "true" {
        ctntResp.Envs["LD_LIBRARY_PATH"] = "/usr/local/nvidia/lib"
    }
}

// NVIDIA_VISIBLE_DEVICES
ctntResp.Envs["NVIDIA_VISIBLE_DEVICES"] = strings.Join(deviceList, ",")

接着根据是否处于 shareMode,也就是单个 gpu 能否被共享来挂载不同的 host 目录。

if shareMode {
    // nvidia 是劫持的库,用在shareMode这种情况
    ctntResp.Mounts = append(ctntResp.Mounts, &pluginapi.Mount{
        ContainerPath: "/usr/local/nvidia",
        HostPath:      types.DriverLibraryPath,
        ReadOnly:      true,
    })
} else {
    // 非shareMode用正常的库即可
    ctntResp.Mounts = append(ctntResp.Mounts, &pluginapi.Mount{
        ContainerPath: "/usr/local/nvidia",
        HostPath:      types.DriverOriginLibraryPath,
        ReadOnly:      true,
    })
}

shareMode 下,会挂载的 host 目录是 /etc/gpu-manager/vdriver/nvidia,这里面是被劫持的库。否则挂载 /etc/gpu-manager/vdriver/origin,里面是原始的 CUDA 库。

紧接着,将 host 上的 /etc/gpu-manager/vm/{podUID} 挂载到容器中,这个是为了容器内可以通过 vcuda.sockvirtual-manager 通信。

// 将host上的/etc/gpu-manager/vm/podUID挂载进去(vcuda.sock),这个目录是在PreStartContainer期间由VirtualManager创建的
ctntResp.Mounts = append(ctntResp.Mounts, &pluginapi.Mount{
    ContainerPath: types.VCUDA_MOUNTPOINT,
    HostPath:      filepath.Join(ta.config.VirtualManagerPath, string(pod.UID)),
    ReadOnly:      true,
})

如果当前请求的容器所属 Pod 没有经过 gpu-admission,还会被放到一个处理队列中:

if predicateMissed {
    ar := &allocateResult{
        pod:     pod,
        result:  PREDICATE_MISSING,
        resChan: make(chan struct{}),
    }

    // 这个 queue 的处理是在virtualmanager里面的process方法
    ta.queue.AddRateLimited(ar)
    <-ar.resChan
}

这个队列会在 pkg/service/allocator/nvidia/allocator.goproccessResult 中处理。

这样,kubelet 调用 Allocate 方法就结束了。这里再来回顾一下上面遗留的问题和相关逻辑:

问题:

  • 问题 A: 为什么要大费周章的通过 grpc,直接挂载容器配置文件可行吗?

    总结: 这一点在上面的阅读中可以发现,这时候容器本身对自己应该限制多少的 gpu 资源调用并不知道。这个问题得和 B/C/D 问题结合来看。因为做 Allocate 调用时,kubelet 并没有告知此时在为哪个容器请求配置。因此只能根据请求的资源量以及 Pod 的 predicateTime 或 createTime 来判断。这个是无法保证一定准确的,因此此时容器的具体资源配置也无法确定。可能这就是要通过 grpc 而不是挂载容器配置文件的原因吧。

  • 问题 B: 如果一个 Pod 中有多个 vcore 请求一致,但是 vmemory 不同的容器,这里只通过 vcore 的请求量来判断,可以保证这个分配请求和我们的候选容器能对的上吗?
    总结:问题 B 是在 unfinisedPod 中查找当前请求的容器。只要能保证 unfinishedPod 是正确的(问题 D 说明不能保证),那么就可以保证容器是对的上的(问题 C 保证了这个结论)。

  • 问题 C: AllocateRequest 是按照 Pod 中的容器顺序来的?
    总结:对于这个问题,最好的回答方式是去看 kubelet 的源代码。

    for _, container := range pod.Spec.Containers {
        if err := m.allocateContainerResources(pod, &container, devicesToReuse); err != nil {
            return err
        }
        m.podDevices.removeContainerAllocatedResources(string(pod.UID), container.Name, devicesToReuse)
    }
    

    这边做 Allocate 的时候,是顺序遍历 Pod 中的容器,因此这个问题的答案是肯定的。

  • 问题 D: 遍历当前节点上的所有 pod,然后挑出需要 gpu 资源的 pod,根据 predicatedTimecreateTime 排序。然后再从这些 pod 中, 按顺序挑出符合这次请求的容器,怎么保证挑出来的容器就是这次分配请求的呢?

    总结:我觉得回答这个问题,需要确定两个大前提,一是 Pod 从创建到发起 Allocate 的过程,都是顺序的。这样就能保证当调用 Allocate 对应的 Pod 永远是尚未分配到资源的第一个。二是在一个 Pod 中,为每个容器 Allocate 时,也是顺序的,这一点在问题 C 中得到确认。

    但是实际上,第一个前提是不能保证的,在 Pod bind 到节点时,这个是并发执行的。因此可以得出一个结论:在这个阶段无法保证 Allocate 请求和我们的候选容器是对应关系。关于这一点我也提了个 issue:a question about Allocate for a container?。官方也给了回答,因为这个原因 gpu manager 有时候会报 UnexpectedAdmissionError 错误。

    所以根据问题 4,我们还要使用 gpu-admission 这个项目,来保证该阶段的正确性,具体机制还得等到看 gpu-admission 的时候才能知道了。

其实以上四个问题都是因为 kubelet 的 Allocate 请求不会带上正在分配的容器。所以需要一系列的查找方式来确定具体的容器。

因为篇幅问题,关于 gpu 的最佳分配策略会作为下一篇文章的内容。

参考资料

从零开始入门 K8s:调度器的调度流程和算法介绍
kubernetes 的挂载传播(mount propagation)机制

概述

今天在看 kubectl-debug 这个项目的时候,看到其部署文件的 volumeMounuts 中使用了一个 mountPropagation 字段,因为不清楚这个字段的作用,就做了一下了解。mount propagation 背后的东西还是很多的,因此整理了这篇文章,顺便梳理一下知识点。

kubernetes 的 mount propagation 翻译成中文就是挂载传播。挂载传播提供了共享卷挂载的能力,它允许在同一个 Pod,甚至同一个节点内,在多个容器之间共享卷的挂载。

kubernetes 的挂载传播

卷的挂载传播由 Container.volumeMounts 的 mountPropagation 字段控制。它的值有:

  • None: 这种卷挂载将不会收到任何后续由 host 创建的在这个卷上或其子目录上的挂载。同样的,由容器创建的挂载在 host 上也是不可见的。这是默认的模式。这个其实很好理解,就是容器内和 host 的后续挂载完全隔离。

  • HostToContainer: 这种卷挂载将会收到之后所有的由 host 创建在该卷上或其子目录上的挂载。换句话说,如果 host 在卷挂载内挂载的任何内容,在容器中都是可见的。同样,如果任何具有 Bidirectional 的 Pod 挂载传播到该卷挂载上,具有 HostToContainer 的挂载传播都可以看见。整个挂载传播的流程如下:

  • Bidirectional: 这种挂载机制和 HostToContainer 类似。此外,任何在容器中创建的挂载都会传播到 host,然后传播到使用相同卷的所有 Pod 的所有容器。注意:Bidirectional 挂载传播是很危险的。可能会危害到 host 的操作系统。因此只有特权容器在允许使用它。

在了解了这几种挂载传播之后,我们可以做一些实验来验证一下,首先验证的是 None 的挂载传播类型,我们创建一个 nginx 的Pod:

apiVersion: v1
kind: Pod
metadata:
    name: mount-a
    namespace: default
    label:
      app: mount
spec:
    containers:
    - name: main
      image: nginx:latest
      volumeMounts:
      - name: testmount
        mountPath: /home
        mountPropagation: None
    volumes:
    - name: testmount
      hostPath:
        path: /mnt/

然后我们分别向 host 的 /mnt 和容器的 /home 下挂载目录并查看容器和 host 的情况:

容器中:

$ kubectl exec -it mount-a sh
$ cd /home
$ ls 
sda1

host 上:

$ cd /mnt
$ ls 
sda1

然后在 host 上创建挂载:

$ mkdir /mnt/none
$ sudo mount --bind /var /mnt/none
$ ls none
cache  empty  lib  lock  log  run  spool  tmp

这个时候,我们再看容器中的文件:

$ ls none
# 无输出

这说明 host 上在该卷下的挂载并不会改变容器中的文件。接下来我们可以在容器中按照上面的方案来验证容器中的挂载也不会影响 host 中的目录视图。这里就不展示了。接下来看一下 HostToContainer 的挂载传播,我们将上面的 Pod 的 mountPropagation 字段改成 HostToContainer,然后先取消 host 上的挂载:

sudo umoint /mnt/none

然后重新创建 Pod,和上面一样,在 host 上创建挂载,查看容器中的挂载情况:

$ ls none
cache  empty  lib  lock  log  run  spool  tmp

host 上的挂载因为 HostToContainer 机制传播到了容器中。我们继续看最后一种 Bidirectional 机制。这次我们要创建两个 Pod: mount-a, mount-b,并把 mountPropagation 字段改成 Bidirectional。注意,因为 Bidirectional 是危险的,所以只有特权容器才可以使用。因此这里还需要把容器改成特权模式,最后在 mount-a 中的容器执行挂载,验证挂载是否传播到 host 和 mount-b 的容器中。

apiVersion: v1
kind: Pod
metadata:
    name: mount-a
    namespace: default
    labels:
      app: mount
spec:
    containers:
    - name: main
      image: nginx:latest
      securityContext:
        privileged: true
      volumeMounts:
      - name: testmount
        mountPath: /home
        mountPropagation: Bidirectional
    volumes:
    - name: testmount
      hostPath:
        path: /mnt/
---
apiVersion: v1
kind: Pod
metadata:
    name: mount-b
    namespace: default
    labels:
      app: mount
spec:
    containers:
    - name: main
      image: nginx:latest
      securityContext:
        privileged: true
      volumeMounts:
      - name: testmount
        mountPath: /home
        mountPropagation: Bidirectional
    volumes:
    - name: testmount
      hostPath:
        path: /mnt/

然后进入 mount-a,创建挂载:

$ kubectl exec -it mount-a sh
$ su
$ mount --bind /var /home/none
$ ls /home/none
backups  lib    lock  mail  run    tmp
cache    local  log   opt   spool

这时候查看 host 下的 /mnt/none:

$ ls /mnt/none
backups  lib    lock  mail  run    tmp
cache    local  log   opt   spool

可以发现,容器中的挂载传播到了 host 上。这时候再查看 mount-b 中的容器。

$ ls /home/none
backups  lib    lock  mail  run    tmp
cache    local  log   opt   spool

挂载也传播到了 mount-b 的容器中。

linux mount 的几种类型

上面分析了 kubernetes 的挂载传播机制,在 linux mount 中,也有类似的概念。mount 分为下面几种:

  • shared mount: 相当于上面所说的 Bidirectional 的挂载传播
  • slave mount: 每个 slave mount 都有一个 shared master mount,挂载传播只能从 master -> slave,等同于上面的 HostToContainer, host 是 master,container 是 slave。
  • private mount: 很明显,private 就是相当于 None,挂载不会向任何一方传播。
  • unbindable mount:unbindable mount 其实就是 unbindable private mount,也就是不允许使用 --bind 的挂载。

mount namespace 的机制

kubernetes 的挂载传播不是其本身实现的,也不是 docker 之类的容器运行时提供的。这是由容器化技术的基础:linux namespace 提供的,linux namespace 当前共有 6 种:

  • cgroup namespace: 隔离 cgroup 根目录
  • pid namespace: 隔离进程 id
  • ipc namespace: 隔离 System V IPC, POSIX message queues
  • uts namespace: 隔离 Hostname 和 NIS domain name
  • user namespace: 隔离用户和用户组 ID
  • mount namespace: 隔离挂载点
  • network namespace: 隔离网络设备,网络栈,端口等

其中,mount namespace 是这篇文章的重点。我们可以通过 clone 调用来看看 mount namespace 的使用:

#define _GNU_SOURCE
#include <stdio.h>
#include <sys/types.h>
#include <sys/wait.h>
#include <sys/mount.h>
#include <sched.h>
#include <signal.h>
#include <unistd.h>

#define STACK_SIZE (1024*1024)
static char container_stack[STACK_SIZE];

char* const container_args[] = {
    "/bin/bash",
    NULL
};

int container_main(void* arg)
{
    printf("Container [%5d] - inside the container!\n", getpid());
    mount("none", "/", NULL, MS_REC|MS_PRIVATE, NULL);
    execv(container_args[0], container_args);
    printf("Something's wrong!\n");
    return 1;
}
int main()
{
    printf("Parent [%5d] - start a container!\n", getpid());
    /* 启用Mount Namespace - 增加CLONE_NEWNS参数 */
    int container_pid = clone(container_main, container_stack+STACK_SIZE, CLONE_NEWNS | SIGCHLD, NULL);
    waitpid(container_pid, NULL, 0);
    printf("Parent - container stopped!\n");
    return 0;
}

编译运行:

$ gcc main.c -o mount
$ sudo ./mount

然后尝试挂载,来验证挂载 MS_PRIVATE 的挂载传播问题。MS_PRIVATE 下 namespace 内和 host 应该是隔离的。MS_PRIVATE 还可以替换成 MS_UNBINDABLEMS_SLAVEMS_SHARED

关于更多的 namespace 的资料,建议看这两篇文章:

参考资料

[Gaia Scheduler] gpu-manager 启动流程分析

概述

Gaia scheduler 是腾讯开源的在 Kubernetes 集群中做 GPU 虚拟化的方案,实现了为容器分配虚拟化 GPU 资源并加以限制,它的最大的优势就是不需要特殊的硬件支持,并且性能损耗很小。关于它的论文,地址在这里:Gaia Scheduler: A Kubernetes-Based Scheduler Framework。如果想要理解这个项目,强烈建议先读这篇论文。

Gaia Scheduler 可以分为 4 个组件:

  • GPU Manager: 作为 device plugin 向 kubelet 注册。共注册了两个设备,包括 vcore 和 vmemory,支持两种计算资源:tencent.com/vcuda-coretencent.com/vcuda-memory,分别用来做 GPU 计算资源和 GPU 内存资源的请求和限制。

  • GPU Scheduler: 这里的 scheduler 并不是 kubernetes 的调度器,是 GPU Manager 在收到 kubelet 的 Allocate 调用后,它需求将设备挂载给容器。为了实现最佳的 GPU 挂载,就有这样一个专门的 Scheduler 来根据节点上当前的 GPU 拓扑和资源占用情况进行调度。

  • vGPU Manager: vGPU Manager 是具体负责管理容器的组件,包括监控容器状态,传递配置,和容器内的vGPU Library通信,以及在容器死亡后进行回收操作。

  • vGPU Library: vGPU Library 虽然相关的代码量不多,但它是 Gaia Scheduler 最重要的部分。因为它是实现 GPU 虚拟化的核心。通过覆盖容器中的 LD_LIBRARY_PATH 以及自定义了 libcuda-control.so 实现对 CUDA API 的拦截。

Gaia Scheduler 主要由三个项目组成: gpu-managervcuda-controllergpu-admission。但是这里的 gpu-manager 是 Gaia Scheduler 的主要实现,包含了上述的 4 个组件,vcuda-controller 就是 vGPU Library,已经被打包到了 gpu-manager 这个项目中。gpu-manager 需要配合 gpu-admission 项目来完成 GPU Scheduler 的工作。不要因此产生误解。下文中我们主要就 gpu-manager 这个项目进行分析。

启动流程分析

gpu-manager 本身主要作为 kubernetes 的 device plugin 来实现的,定义了两种设备: vcuda-corevcuda-memory,我们的应用通过 pod 的资源字段进行申请,然后 kube-scheduler 会根据节点上的资源状态进行调度。因此,你最好还需要了解 kubernetes 的 device plugin 的开发知识。关于 device plugin 的开发,可以看之前的一篇文章:Kubernetes开发知识–device-plugin的实现

启动参数

分析一个项目从启动参数开始,可以帮助我们快速了解:

  • driver: 这个是 GPU 的驱动,当前的默认值是 nvidia,很显然该项目可以扩展支持其他类型的 GPU。
  • extra-config: 额外的配置,这个参数暂时看不出来有什么特别
  • volume-config: 这里的 volume 指的是一些动态链接库和可执行文件的位置。也就是 gpu-manager 需要拦截调用的一些库
  • docker-endpoint: 用来挂载到容器中和 docker 做通信的,默认位置是 unix:////var/run/docker.sock
  • query-port: 统计信息服务的查询接口
  • query-port: 统计信息服务的监听地址
  • kubeconfig: 用来授权的配置文件
  • standalone: 暂时还不清楚的参数
  • sample-period: gpu-manager 会查询 gpu 设备的使用情况,这个参数用来设定采样周期
  • node-labels: 给节点自动打标签
  • hostname-override: gpu-manager 在运行时,只关注自己节点上的 pod,这主要是通过 hostname 来辨认的
  • virtual-manager-path: gpu-manager 会为所有需要虚拟 gpu 资源的 pod 创建唯一的文件夹,文件夹的路径就在这个地址下。
  • device-plugin-path: kubernetes 默认的 device plugin 的目录地址
  • checkpoint-path: gpu-manager 会产生 checkpoint 来当缓存用
  • share-mode: gpu-manager 最大的特点就是将一个物理 gpu 分成多个虚拟 gpu,也就是共享模式
  • allocation-check-period: 检查分配了虚拟 gpu 资源的 pod 的状态,及时回收资源
  • incluster-mode: 是否在集群内运行

服务启动

gpu-manager 推荐的部署方案是通过 kubernetes 的 daemonset,然后配置 node selector 调度到指定的节点上。然后 gpu-manager 就开始在指定节点上启动了。

srv := server.NewManager(cfg)
go srv.Run()

这里,我们需要看一下这个 srv 的具体实现,首先是它的结构体:

type managerImpl struct {
    config *config.Config

    allocator      allocFactory.GPUTopoService     // gpu 容器调度分配
    displayer      *display.Display                // gpu 使用情况可视化服务
    virtualManager *vitrual_manager.VirtualManager // 负责管理 vgpu

    bundleServer map[string]ResourceServer
    srv          *grpc.Server
}

config 包含了我们上面的所有参数,就不进去细看了。

allocator 负责在容器调度到节点上后,为其分配具体的设备资源。allocator 实现了探测节点上的 gpu 拓扑架构,然后以最佳性能,最少碎片为目的使用最优的方案进行资源分配。

displayer 是将 gpu 的使用情况输出,方便我们查看。

virtualManager 负责 vgpu 分配后的管理工作。

bundleServer 包含 vcore,vmemory,我们上面提到这两种资源以 device plugin 的方式进行注册,因此他们需要启动 grpc server。

srv: 将 gpu display server 注册到这个 grpc server 中。

接下来,我们就可以分析 srv.Run() 方法具体执行了哪些内容。为了先对整个流程有个大概的印象,我将内容整理成以下条目:

  • 启动 volumeManager,将节点上和 nvidia gpu (包括cuda) 的所有可执行文件和库移动到 /etc/gpu-manager/vdriver 中。并且将关键的库替换成 vcuda-control,实现 cuda 调用的拦截。
  • watchdog 创建 pod 缓存并监控 pod,之后所有关于 pod 的操作都来源于这里。
  • watchdog 给节点打上标签
  • 启动 virtualManager
  • gpu 拓扑结构感知。
  • 初始化资源分配器
  • 设置 vcuda, vmemory, display 的 grpc 服务
  • 启动 metrics 的 http 服务,主要是提供给 prometheus
  • 启动 vcuda,vmemory 的 grpc 服务
  • 启动 display 的 grpc 服务

接下来,我们具体来分析每一步是如何做的。当然,这里只会挑一些重点的部分。

volumeManager 的启动

func (vm *VolumeManager) Run() (err error) {
    // ldcache 是动态链接库的缓存信息
    cache, err := ldcache.Open()
    defer func() {
        if e := cache.Close(); err == nil {
            err = e
        }
    }()
    vols := make(VolumeMap)
    for _, cfg := range vm.Config {
        vol := &Volume{
            Path: path.Join(cfg.BasePath, cfg.Name),
        }

        if cfg.Name == "nvidia" {
            // nvidia 库的位置
            types.DriverLibraryPath = filepath.Join(cfg.BasePath, cfg.Name)
        } else {
            // origin 库的位置
            types.DriverOriginLibraryPath = filepath.Join(cfg.BasePath, cfg.Name)
        }

        for t, c := range cfg.Components {
            switch t {
            case "binaries":
                // 调用 which 来查找可执行文件的位置
                bins, err := which(c...)
                // 将实际位置存起来
                vol.dirs = append(vol.dirs, volumeDir{binDir, bins})
            case "libraries":
                // 是库的话,就从 ldcache 里面去找
                libs32, libs64 := cache.Lookup(c...)
                // 将 library 位置存起来
                vol.dirs = append(vol.dirs, volumeDir{lib32Dir, libs32}, volumeDir{lib64Dir, libs64})
            }
            vols[cfg.Name] = vol
        }
    }
    // 找到了需要的库位置之后,做 mirror 处理
    if err := vm.mirror(vols); err != nil {
        return err
    }
    return nil
}

这段代码的前半部分都是在查找指定的动态链接库和可执行文件,这些文件是在 volume.conf 这个配置文件中指定的,通过参数传进来。查找动态链接库时,使用的是 ldcache,查找可执行文件时,使用了系统的 which 指令。找到之后会将其所在位置记录下来。接着就是对找到的库做 mirror 处理。

func (vm *VolumeManager) mirror(vols VolumeMap) error {
    // nvidia 和 origin
    for driver, vol := range vols {
        if exist, _ := vol.exist(); !exist {
            // 这里的path是/etc/gpu-manager/vdriver下面
            if err := os.MkdirAll(vol.Path, 0755); err != nil {
                return err
            }
        }
        for _, d := range vol.dirs {
            vpath := path.Join(vol.Path, d.name)
            // 创建 bin lib lib64
            if err := os.MkdirAll(vpath, 0755); err != nil {
                return err
            }

            // For each file matching the volume components (blacklist excluded), create a hardlink/copy
            // of it inside the volume directory. We also need to create soname symlinks similar to what
            // ldconfig does since our volume will only show up at runtime.
            for _, f := range d.files {
                glog.V(2).Infof("Mirror %s to %s", f, vpath)
                if err := vm.mirrorFiles(driver, vpath, f); err != nil {
                    return err
                }

                if strings.HasPrefix(path.Base(f), "libcuda.so") {
                    driverStr := strings.SplitN(strings.TrimPrefix(path.Base(f), "libcuda.so."), ".", 2)
                    types.DriverVersionMajor, _ = strconv.Atoi(driverStr[0]) // 驱动版本号
                    types.DriverVersionMinor, _ = strconv.Atoi(driverStr[1])
                    glog.V(2).Infof("Driver version: %d.%d", types.DriverVersionMajor, types.DriverVersionMinor)
                }

                if strings.HasPrefix(path.Base(f), "libcuda-control.so") {
                    vm.cudaControlFile = f
                }
            }
        }
    }

    vCudaFileFn := func(soFile string) error {
        if err := os.Remove(soFile); err != nil {
            if !os.IsNotExist(err) {
                return err
            }
        }
        if err := clone(vm.cudaControlFile, soFile); err != nil {
            return err
        }

        glog.V(2).Infof("Vcuda %s to %s", vm.cudaControlFile, soFile)

        l := strings.TrimRight(soFile, ".0123456789")
        if err := os.Remove(l); err != nil {
            if !os.IsNotExist(err) {
                return err
            }
        }
        if err := clone(vm.cudaControlFile, l); err != nil {
            return err
        }
        glog.V(2).Infof("Vcuda %s to %s", vm.cudaControlFile, l)
        return nil
    }

    if vm.share && len(vm.cudaControlFile) > 0 {
        if len(vm.cudaSoname) > 0 {
            for _, f := range vm.cudaSoname {
                if err := vCudaFileFn(f); err != nil {
                    return err
                }
            }
        }

        if len(vm.mlSoName) > 0 {
            for _, f := range vm.mlSoName {
                if err := vCudaFileFn(f); err != nil {
                    return err
                }
            }
        }
    }

    return nil
}

这段代码先会对所有上面查找到的库或可执行文件调用 mirrorFiles,但是记录下来了 libcuda.so 的版本号和 libcuda-control.so 的位置。注意,这个 libcuda-control 就是 vcuda-control 项目生成的用来拦截 cuda 调用的库。

然后将 cudaControlFile clone到所有 cudaSonamemlSoName 中库的位置。这个 clone 方法会先尝试硬链接过去,如果失败就直接复制过去。这里的 cudaControlFile 就是我们上面所说的 libcuda-control.so 啦。cudaSonamemlSoName 包含了所有需要被拦截调用的库。这样子就实现了拦截所有的 cuda 调用。下面我们在看一下 mirrorFiles 这个方法就可以了。

// driver 是配置文件中的 "nvidia" 或 "origin"
// vpath 是要 mirror 到的位置,在 /etc/gpu-manager/vdriver 下面
func (vm *VolumeManager) mirrorFiles(driver, vpath string, file string) error {
    // In computing, the Executable and Linkable Format (ELF, formerly named Extensible Linking Format), is a common standard file format for executable files, object code, shared libraries, and core dumps
    obj, err := elf.Open(file)
    defer obj.Close()

    // 黑名单机制,具体用处还不清楚,跟 nvidia 的驱动相关
    ok, err := blacklisted(file, obj)
    if ok {
        return nil
    }
    l := path.Join(vpath, path.Base(file))
    // 不管有没有,先尝试把 gpu-manager 里面的移除
    if err := removeFile(l); err != nil {
        return err
    }
    // clone 优先硬连接,其次是复制文件到指定位置
    if err := clone(file, l); err != nil {
        return err
    }
    // 从 elf 中获取当前库的 soname
    soname, err := obj.DynString(elf.DT_SONAME)
    if len(soname) > 0 {
        // 将获取到 soname 组成路径
        l = path.Join(vpath, soname[0])
        // 如果文件和它的soname不一致(是否可以认为这个文件是软链接过去的)
        if err := linkIfNotSameName(path.Base(file), l); err != nil && !os.IsExist(err) {
            return err
        }

        // XXX Many applications (wrongly) assume that libcuda.so exists (e.g. with dlopen)
        // Hardcode the libcuda symlink for the time being.
        if strings.Contains(driver, "nvidia") {
            // 这里为什么要移除 libcuda.so 和 libnvidia-ml.so 的软链接
            // 因为gpu调用会涉及到这两个库,这两个库会软链接到真实的库上。移除后替换成拦截的库
            // Remove libcuda symbol link
            if vm.share && driver == "nvidia" && strings.HasPrefix(soname[0], "libcuda.so") {
                os.Remove(l)
                vm.cudaSoname[l] = l
            }

            // Remove libnvidia-ml symbol link
            if vm.share && driver == "nvidia" && strings.HasPrefix(soname[0], "libnvidia-ml.so") {
                os.Remove(l)
                vm.mlSoName[l] = l
            }

            // XXX GLVND requires this symlink for indirect GLX support
            // It won't be needed once we have an indirect GLX vendor neutral library.
            if strings.HasPrefix(soname[0], "libGLX_nvidia") {
                l = strings.Replace(l, "GLX_nvidia", "GLX_indirect", 1)
                if err := linkIfNotSameName(path.Base(file), l); err != nil && !os.IsExist(err) {
                    return err
                }
            }
        }
    }

    return nil
}

这段代码中,先使用 blacklisted 排除一些不需要处理的库,然后尝试将库或可执行文件 clone 到我们的 /etc/gpu-manager/vdriver 下面。/etc/gpu-manager/vdriver 下面有两个文件夹,一个是 nvidia,保存了已经被我们拦截的库,一个是 origin,这里面是原始的未处理的库。同时,还将 libcuda.so 和 libnvidia-ml.so 移除了,这样就调用不到真实的库了,转而在之后用我们拦截的库来替换这几个文件。

至此,volumeManager 分析结束。

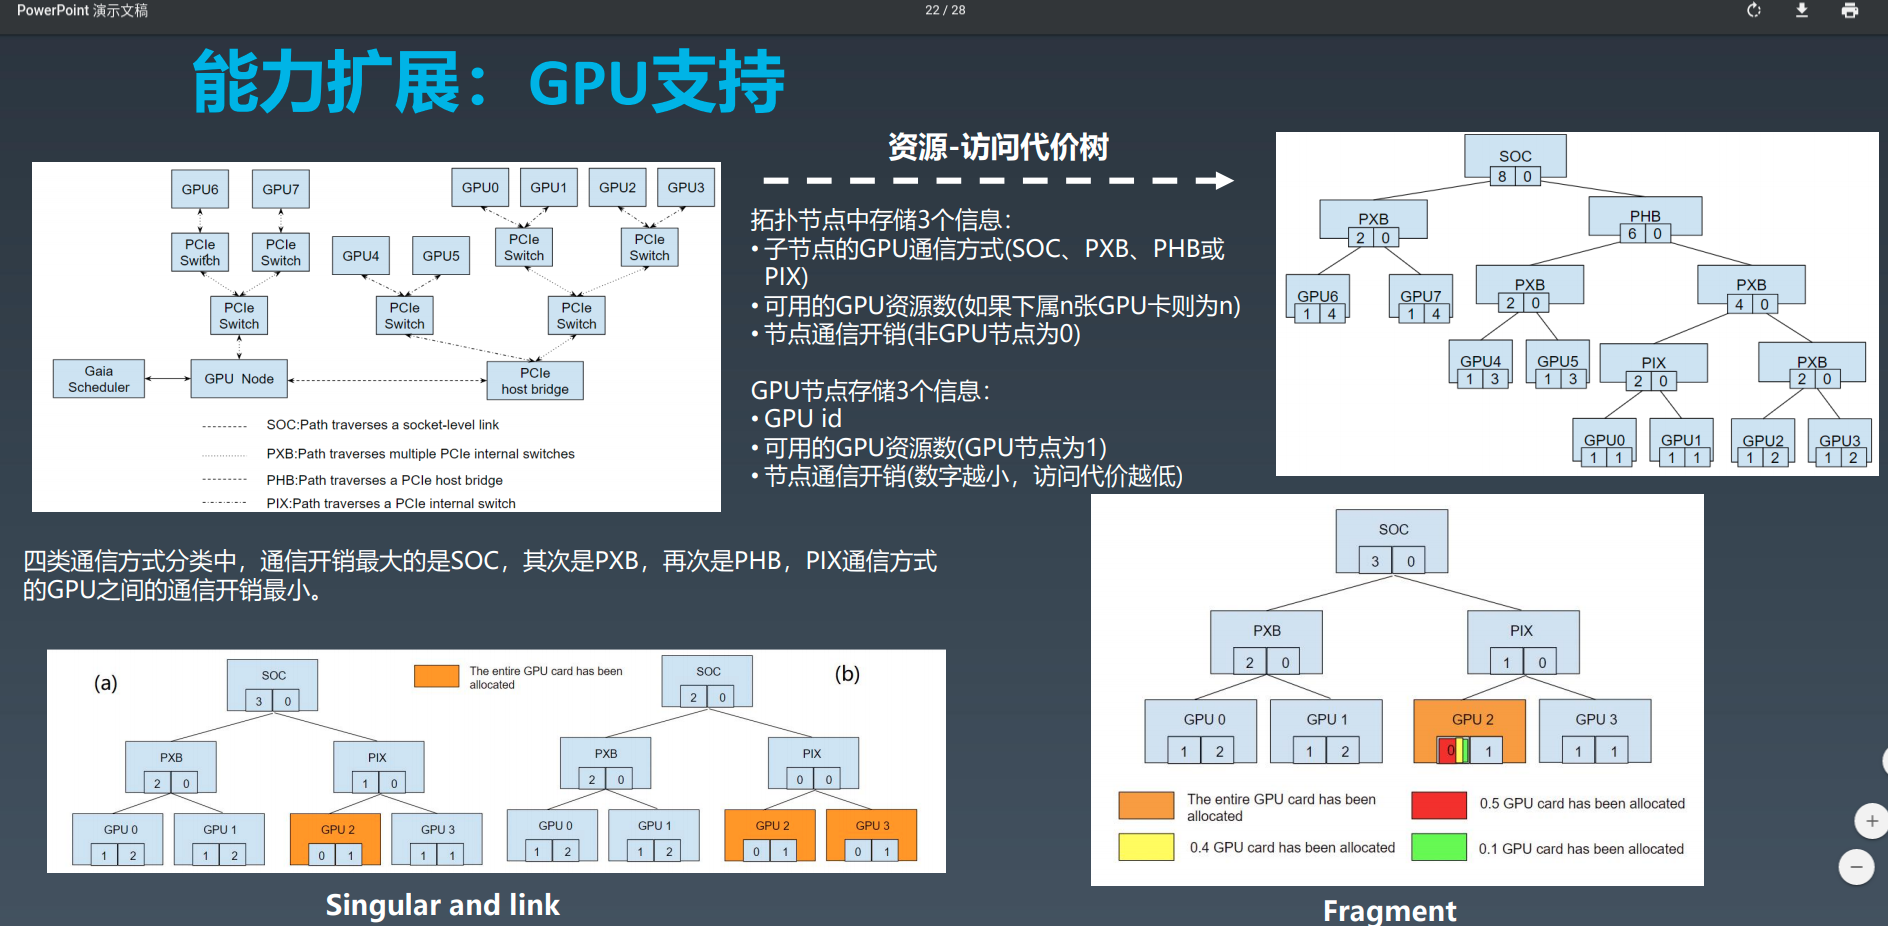
gpu 拓扑结构感知

关于 gpu 拓扑结构这一块,主要是为了在之后做资源分配时选择最优方案用的。腾讯也有分享过这一块的资料(腾讯基于 Kubernetes 的企业级容器云实践):

gpu 拓扑结构

这里不影响我们理解整个工作机制,所以先不分析。

初始化资源分配器

// 分配器,根据driver调用相应的分配器
initAllocator := allocFactory.NewFuncForName(m.config.Driver)
if initAllocator == nil {
    return fmt.Errorf("can not find allocator for %s", m.config.Driver)
}

m.allocator = initAllocator(m.config, tree, client)

这里的 initAllocator 对应的方法是:

//NewNvidiaTopoAllocator returns a new NvidiaTopoAllocator
func NewNvidiaTopoAllocator(config *config.Config, tree device.GPUTree, k8sClient kubernetes.Interface) allocator.GPUTopoService {
    runtimeRequestTimeout := metav1.Duration{Duration: 2 * time.Minute}
    imagePullProgressDeadline := metav1.Duration{Duration: 1 * time.Minute}
    dockerClientConfig := &dockershim.ClientConfig{
        DockerEndpoint:            config.DockerEndpoint,
        RuntimeRequestTimeout:     runtimeRequestTimeout.Duration,
        ImagePullProgressDeadline: imagePullProgressDeadline.Duration,
    }

    _tree, _ := tree.(*nvtree.NvidiaTree)
    cm, err := checkpoint.NewManager(config.CheckpointPath, checkpointFileName)
    if err != nil {
        glog.Fatalf("Failed to create checkpoint manager due to %s", err.Error())
    }
    alloc := &NvidiaTopoAllocator{
        tree:              _tree,
        config:            config,
        evaluators:        make(map[string]Evaluator),
        dockerClient:      dockershim.NewDockerClientFromConfig(dockerClientConfig),
        allocatedPod:      cache.NewAllocateCache(),
        k8sClient:         k8sClient,
        queue:             workqueue.NewRateLimitingQueue(workqueue.DefaultControllerRateLimiter()),
        stopChan:          make(chan struct{}),
        checkpointManager: cm,
    }

    // Load kernel module if it's not loaded
    alloc.loadModule()

    // Initialize evaluator
    alloc.initEvaluator(_tree)

    // Read extra config if it's given
    alloc.loadExtraConfig(config.ExtraConfigPath)

    // Process allocation results in another goroutine
    go wait.Until(alloc.runProcessResult, time.Second, alloc.stopChan)

    // Recover
    alloc.recoverInUsed()

    // Check allocation in another goroutine periodically
    go alloc.checkAllocationPeriodically(alloc.stopChan)

    return alloc
}

allocator 调用 loadModule() 来启用 nvidia 的内核模块。

调用 initEvaluator(_tree) 来初始化评估器,这里的 _tree 就是感知到的 gpu 拓扑结构。

调用 loadExtraConfig(config.ExtraConfigPath) 来加载启动时传入的额外参数配置文件。

go wait.Until(alloc.runProcessResult, time.Second, alloc.stopChan) 创建了新的协程来处理分配结果。

recoverInUsed() 是恢复 gpu 分配结果。比如在 gpu-manager 重启之后,之前的 gpu 分配结果都丢失了,但是节点上还有大量的容器正在占用 gpu,这个方法会通过查找节点上存活的容器,通过 docker endpoint, 调用 InspectContainer 获取容器中占用的 device id,然后标记该设备和容器之间的占用关系。

go alloc.checkAllocationPeriodically(alloc.stopChan) 创建新的协程来周期性的检查资源分配情况。如果是 Failed 和 Pending 状态的容器,就根据错误信息检查是否应该删除它们,然后如果这些 pod 的控制器是 deployment 类似的,就尝试删除它们,这样控制器会重新创建这些 pod 进行调度,让这些 pod 恢复到正常运行状态。

启动各种服务

vcuda,vmemory 的 grpc 服务是 device plugin 的机制。metrics service 是提供给 prometheus 调用的,以监控该节点的相关信息。display 服务会打印 gpu 拓扑结构的相关信息。

Device plugin 的注册

Device plugin

这张图是 device plugin 注册的时序图。gpu-manager 的注册方法是:

func (m *managerImpl) RegisterToKubelet() error {
    socketFile := filepath.Join(m.config.DevicePluginPath, types.KubeletSocket)
    dialOptions := []grpc.DialOption{grpc.WithInsecure(), grpc.WithDialer(utils.UnixDial), grpc.WithBlock(), grpc.WithTimeout(time.Second * 5)}

    conn, err := grpc.Dial(socketFile, dialOptions...)
    if err != nil {
        return err
    }
    defer conn.Close()

    client := pluginapi.NewRegistrationClient(conn)

    for _, srv := range m.bundleServer {
        req := &pluginapi.RegisterRequest{
            Version:      pluginapi.Version,
            Endpoint:     path.Base(srv.SocketName()),
            ResourceName: srv.ResourceName(),
            Options:      &pluginapi.DevicePluginOptions{PreStartRequired: true},
        }

        glog.V(2).Infof("Register to kubelet with endpoint %s", req.Endpoint)
        _, err = client.Register(context.Background(), req)
        if err != nil {
            return err
        }
    }

    return nil
}

这里分别注册了 vcuda 和 vmemory。vcuda 和 vmemory 的 Allocate 方法都指向了同一个方法,写在了 service/allocator/nvidia/allocator.go 中。

至此,gpu-manager 的启动流程结束。接下来的 gpu-manager 的职责就是等待 kubelet 通过 grpc 的调用,在容器调度到节点的时候进行资源设备的分配,必要目录的挂载等工作了。具体的可以见下一篇文章

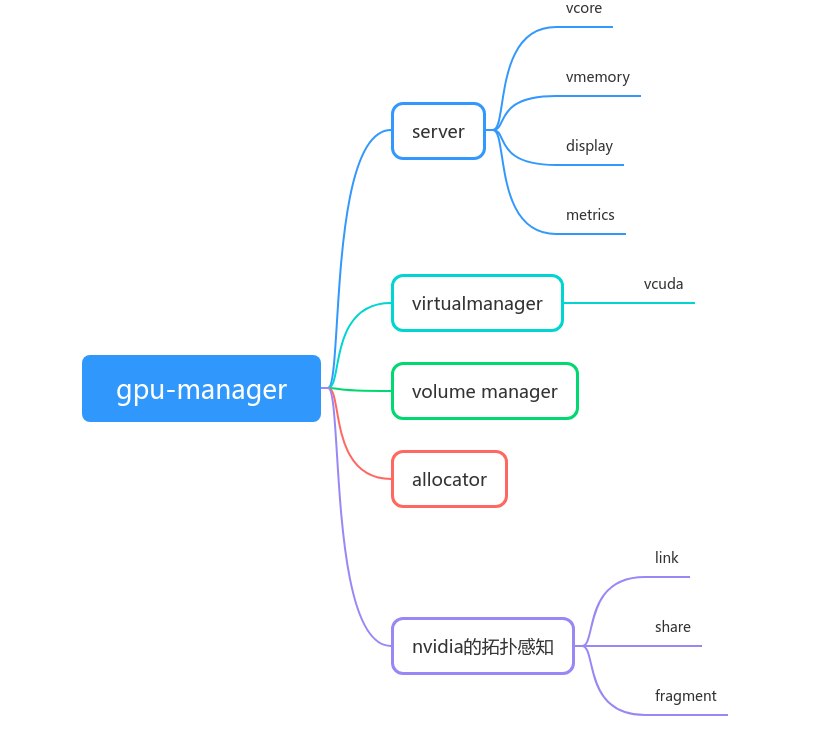
最后,提供一个简单的脑图帮助理解:

gpu-manager-arch